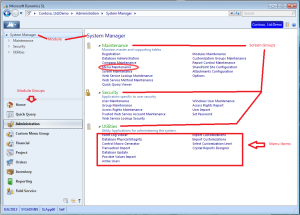
The Dynamics SL menu system allows a significant amount of flexibility in setting up custom menus. There are 3 separate grouping levels above the menu items, and it is even possible to add notes (after a fashion). This permits the possibility of setting up specific purpose menu pages containing directions or grouping disparate programs that would normally be spread among several separate pages.
The standard SL menu belongs to the EVERYONE group, and modifications are not permitted to that menu. Thus, the first step in creating a custom menu is to create the Group that will own the menu. The users who will be using that custom menu can be added in the grid on the screen, either at this time or later, but they aren’t necessary for setting up the menu. Now go to the menu screen and enter that new group to begin creating the new menu.
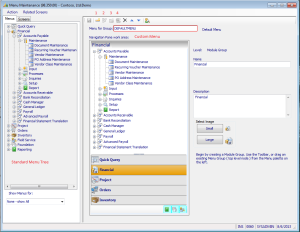
The next step is the module groups. Existing module groups can be added to the new menu by dragging them from the tree in the upper left (Standard Menu Tree in the image above) into the panel in the middle of the screen (Custom Menu). Those groups will generally be added to the bottom of the list (and you are not permitted to move them later, so plan ahead). One benefit for adding items to the menu this way is that all elements related to that object are also added. Thus, in one simple step all Financial items can be added to your new menu – including the eight modules contained in that group, all of the screen groups, and menu items for those modules. There is one trick – if you want to add the Administration group to your menu, you will need to change the dropdown box in the lower left to ADMINISTRATORS to load that option into the tree for copying. It is also possible to create new custom module groups by pressing the appropriate button in the menu bar at the top of the screen (1). In either case, you can change the name of the group, the description, and the icons that it uses to suit your needs.
Inside the module groups come the modules. Here again, you have options for adding them to the module group. They can be dragged from the tree on the left and dropped into a module (here you can move them up and down in the list) or created from scratch via the button on the menu bar (2). It is also possible to delete modules in the group that you don’t want (likely to be useful if you dragged the group into place). Here again, you have control over the name, description, and icons of the module, whether copied or created. This level defines a menu page – from this point, you will be setting up what the individual pages looks like.
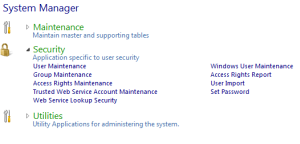
Next comes the last of the grouping layers – the screen group. These are created (3) beneath the modules (or, again, pasted from the tree on the left), and allow screens to be associated into sets. These screen groups can be collapsed on the menu, which can be convenient. Technically, this level is not required – screens can be added directly to the module, but, for the most part, using screen groups to organize the page is a better option. This level allows the user to control the name of the group, the description, and the icons displayed in the same fashion as the earlier levels. One difference from the earlier groups is that the screen group description will actually be displayed on the screen.
We arrive at last at the most important part of the menu – the individual items. The purpose of the menu, after all, is to make running the programs convenient, and the individual items are how those programs are launched. These items can be added directly to a module, to a screen group, or both. The user specifies the name for the line, which appears on the menu. When the item is a SL screen or report, the number of that screen can be entered into the screen ID field and the command line will be generated automatically. Normally no further changes will need to be made to that command line in this case (the most common exception would be for running an SSRS report, which needs to use ROISRS.EXE instead of ROI.EXE), but the line can be changed if required.
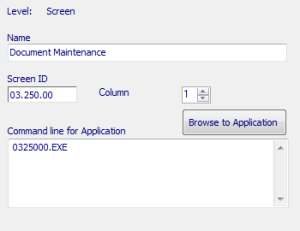
The programs included in the menu are not limited to SL screens – any program that can be launched via command line can be run from the menu. This is done by typing the text necessary to run the program into the command line, either the specific path or a relative one using windows environment variables (for example, the better command line for launching notepad would be %windir%system32notepad.exe, although a specific path will also work for all workstations that have that same path). There are a number of these variables available. Among those that are most likely to be useful are %windir% (windows directory), %ProgramFiles% (Program Files directory), %CommonProgramFiles% (Common Files directory under Program Files), and %path% (path is a special case which consists of a list of paths to be used). On a 64-bit system, there are variants for the program files and common files directories – %ProgramFiles(x86)% and %CommonFiles(x86)%. Those references will access the directories for 32-bit programs that exist in the 64-bit windows operating systems.
If no command line is specified for a menu item, you have effectively added a note to the screen. It will not stand out from the other items (it looks like any other menu item), which is inconvenient, but clicking it will do nothing. These notes are restricted to the 40 characters available for the item name, but do allow simple instructions to be included on the menu. Using the column value can be helpful here. Two columns are allowed in the menu. Normally this is be used to make the list of options shorter and show more of the menu on screen at once. But when putting notes on screen, the column can be used to put the note next to the related program. One other issue – adding blank lines won’t work. Some value is needed in the name field, but making that name a dot or a dash will accomplish almost the same thing and allow even greater control for the layout of items in the list.
One note should be made concerning security. Any item lines that are not linked to SL screens will not be affected by SL security – any outside programs or notes referenced in the menu will be available (or displayed) for any user in the menu group. SL programs will only be available if the user also has at least view rights to the screen. Further, the menu will only display screen groups, modules, or menu groups that contain at least one line available to the user.
Those are the pieces for assembling custom menu structures. They do allow significant control over the presentation of the menu pages, although that control is still a bit ham handed. The last point to consider is the treatment of multiple menus for a user. Users in multiple menu groups see merges of those menus, merges outside of direct user control. The method that gives the most control is to set up a custom menu containing all settings for a user (or users). Remove those users from the EVERYONE group and add them solely to this custom menu, and it will display as you intended.
You do have some control over the merge – the system is smart enough to recognize menu elements that match (module group to module group, module within module group to module within module group, etc.) – when an element from two menus matches, only the first instance will be displayed, with the first group alphabetically as the starting point. Unique elements from later menu groups will be added to that definition, matching that second menu’s layout as nearly as possible. By naming your menu groups with that in mind, you can exercise a minimal amount of control over the results. Individual users will, of course, see only those module groups, modules, screen groups, and menu items to which they have rights and that appear on a menu in whose group they are a member.
From here, it’s just a matter of experimenting until you get the menu screens to look the way that you desire.
For more information or help with setting up customer menus, contact the Dynamics SL experts at Boyer & Associates.


