I wish I had access to some quick start tips when I first started learning how to use Windows PowerShell ISE to administer Microsoft Dynamics NAV. With that in mind, this blog offers some quick tips to get you started.
From here on out, I’m going to refer to Windows PowerShell ISE simply as PowerShell. This isn’t exactly accurate since there is a separate console tool that’s called PowerShell. To keep it simple, just know that when I say PowerShell, I am referring to Windows PowerShell ISE.
Suggested Screen Layout for Windows PowerShell ISE
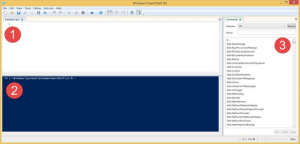
These two screen shots show how I like to set up my PowerShell screen:


- Script Pane on the top
- Console on the bottom
- Command Add-on shown on the right
This layout allows me to write scripts in the top left part of the screen (via the Script Pane), see the results of running my scripts in the bottom left part of the screen (via the Console) and still easily access the super helpful Command Add-on tools on the right side of the screen.
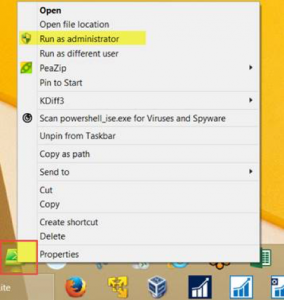
NOTE: In order to run certain PowerShell cmdlets, you’ll need to open PowerShell using the “Run as administrator” option. I do this by holding down the “Shift” key and right clicking my PowerShell taskbar application icon. This displays a menu, which has the “Run as administrator” option listed.
Here’s what I see when I “Shift+Right Click” on the taskbar icon (using Windows 8.1 Enterprise):

Quick Start Tips for PowerShell for Dynamics NAV
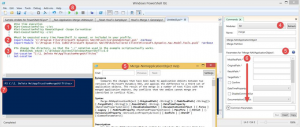
To make these tips visually easier to follow, refer to the image below for each numbered tip.

Tip 1
If this is your first time using PowerShell, you’ll need to run the following script in order to be able to run certain cmdlets. To run the script, copy and paste the red text below into the Script Pane, highlight the text and click “F8” to run the highlighted script line. After you’ve run this once on your computer, you won’t have to run it again:
Set-ExecutionPolicy RemoteSigned -Scope CurrentUser
Note that when creating scripts in the Script Pane, you can comment out script lines by putting a preceding “#” before any code you don’t want executed. Wherever the pound sign is located on a line, PowerShell will not execute any script code to the right of that pound sign. You can easily see what won’t run because that text will be green.
Tip 2
In order to run NAV administration cmdlets, the cmdlets first need to be loaded into PowerShell. These cmdlets need to be imported every time PowerShell is opened. You can import the NAV administration cmdlets by running the two following scripts:
- Import-Module ‘C:\Program Files\Microsoft Dynamics NAV\90\service\NAVAdminTool.ps1’ -Verbose
- Import-Module ‘C:\Program Files (x86)\Microsoft Dynamics NAV\90\RoleTailored Client\Microsoft.Dynamics.Nav.Model.Tools.psd1’ -Verbose
Note that the actual file path locations you’ll need to use may be different if, for example, you’re using a different version of NAV. The directory paths shown above should give you a hint on where to find these files. Also note that these directory paths and files exist only after installing NAV.
Tip 3
You may want or need to use the “Set-Location” command in order to utilize certain cmdlet scripts. For example, the script below is part of an example script provided by Microsoft and is found within the NAV application media. The blue text parts of the script are directory folder paths that use a preceding “.\” to shorten the parameter being fed into the cmdlet. In order for this script to work properly, however, PowerShell needs to be pointed towards the proper directory path (see Tip 7) before the script is run.
Merge-NAVApplicationObject -OriginalPath .\demodata\ORIGINAL\*.txt -ModifiedPath .\demodata\MODIFIED\*.txt -TargetPath .\demodata\TARGET\*.txt -ResultPath .\demodata\RESULT -Force
Tip 4
After running the scripts in tip 2, you will need to click on the “Refresh” button for the new cmdlets to be shown and available in the Command Add-on window.
Tip 5
PowerShell has great help information available for all the cmdlets. In order to find help with a specific cmdlet, search for the cmdlet via the “Name” field in the Command Add-on window. Click on the cmdlet for which you need help and then click on the blue question mark. The “Help” page will then be presented, giving you information about all available parameters and providing examples scripts, which is very helpful. The help information likely won’t answer all of your questions, but it’s a great starting point.
Tip 6
The Command Add-on screen includes a helpful tool for starting to build your first scripts. By entering appropriate parameter values into the cmdlet specific fields presented and clicking on the “Copy” button, you can then paste your new script lines into the Script Pane.
Tip 7
In order to point to the appropriate directory path or to change the directory path, you can use the “Set-Location” cmdlet. Item 7 in the screenshot above shows that I’m working in the C:\1. Delete Me\ApplicationMergeUtilities directory. By working in this directory folder, I can now use the “.\” notation to abbreviate directory paths for any folder paths that exist within that directory. Prior to taking the screen shot, I changed the directory folder by running the following script:
Set-Location “C:\1. Delete Me\ApplicationMergeUtilities”
Tip 8
These two buttons, “Run Script” and “Run Selection,” are used to execute the scripts you’ve written in the Script Pane. Understanding how these buttons work is important. The “Run Script” button is used to run all lines of the script pane (except those parts that are commented out via the pound sign).
The “Run Selection” button is used to execute highlighted Script Pane lines — all other parts of the script are ignored. By using the “Run Selection” button, you can easily test smaller parts of your scripts to make sure they’re working the way you want.
Tip 9
In PowerShell, it is possible to declare and populate variables and then use these variable as parameters in your cmdlets. To establish a variable, you simply put a “$” character in front of a text string, as shown in the screenshot below. The three variables established in the script below are “$DatabaseName,” “$Path” and “$DatabaseServer.” Also demonstrated in the script below is how to assign a value to a variable and how to use variables as parameters when executing cmdlets.


