Not everyone is ready yet to move to Dynamics SL 2011. There are SQL database upgrades that need to take place that some Dynamics SL users are not ready yet to make.
For the many users out there that have bought 64-bit computers that run Windows 7-this post is for you.
The below information was provided to me by Jeff Larson, an environment specialist for both Dynamics SL and Dynamics GP.
Microsoft Dynamics SL 7.0
From the Microsoft Dynamics SL 7.0 System Requirements document from Microsoft:
“Note: On 64-bit operating systems, Microsoft Dynamics SL 7.0 FP1 and later will install in the “Windows on Window” folder and will run in 32-bit mode. Earlier Microsoft Dynamics SL versions do not support 64-bit operating systems.”
To verify your Microsoft Dynamics SL 7.0 version:
1. Start Microsoft Dynamics SL 7.0
2. On the main menu select Help | About Microsoft Dynamics SL…
3. The “About” screen will display. 
4. Check your version number (highlighted above).
5. Version numbers and service pack levels:
· 7.00.XXXXX – Initial release (RTM) without any service pack installed.
· 7.01.XXXXX.XX – Service Pack 1 installed.
· 7.02.XXXXX.XX – Service Pack 2 installed.
· 7.03.XXXXX.XX – Feature Pack 1 release.
· 7.04.XXXXX.XX – Service Pack 3 installed to Feature Pack 1 install.
· 7.05.XXXXX.XX – Service Pack 4 installed to Feature Pack 1 install.
(Where XXXXX.XX numbers can vary depending on different hot fixes installed)
6. Click the OK button to close the “About” screen.
Microsoft FRx 6.7
Microsoft FRx 6.7 is 32-bit compatible only, and not supported by Microsoft on a 64-bit operating system. The shared files can reside on a 64-bit operating system without any issues. We have many clients that are running Microsoft FRx 6.7 on a 64-bit operating system without any issues and we (Boyer & Associates) will do all we can to support Microsoft FRx on those 64-bit operating systems but if issues arise beyond our troubleshooting efforts we cannot use Microsoft Support for any assistance. We suggest that your Microsoft FRx 6.7 installation be running at SP 11 or greater for best results with Microsoft FRx 6.7 on a 64-bit operating system.
To verify your FRx service pack version:
1. Start Microsoft FRx 6.7 Report Designer.
2. On the menu select Help | About FRx…
3. The About FRx Report Designer screen will appear. 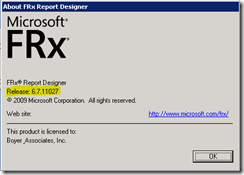
4. Check your Release number (highlighted above).
5. Release numbers and service pack levels:
· 6.7.911 – Service Pack 9 installed (initial install version for Microsoft Dynamics SL 7.0).
· 6.7.10343 – Service Pack 10 installed.
· 6.7.11027 – Service Pack 11 installed.
· 6.7.12008 – Service Pack 12 installed.
6. Click the OK button to close the About FRx Report Designer screen.
Tips and Tricks for successfully installing the Microsoft Dynamics SL 7.0 client and FRx 6.7 client on any Windows Vista or Windows 7 64-bit operating system. (Windows XP 64-bit not recommended)
1. Run the installations as a member of the local Administrators group. This is a requirement actually.
2. Close any running applications. Since the Microsoft Dynamics SL client install will prompt for a reboot when complete it is suggested that any other applications be closed during the install especially Microsoft Office as it shares some of the same DLL files.
3. Make sure the drive mapping to the Microsoft Dynamics SL shared folder is mapped correctly.
a. If you look at the folders under the drive mapping the module folders (AP, AR, GL, etc.) should not be at the first level under the mapped drive letter there should be at least one folder level in between.
§ Correct drive mapping: 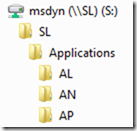
§ Incorrect drive mapping: 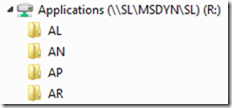
b. If the drive mapping is incorrect please contact your IT department to correct. Please note, if the mapping is incorrect for all workstations currently installed the Microsoft Dynamics SL client will have to be uninstalled on those clients, the drive mapping corrected, and then the Microsoft Dynamics SL client reinstalled.
4. User Account Control (UAC)
a. Turn off UAC prior to performing any installations of the Microsoft Dynamics SL 7.0 client or FRx 6.7 client. UAC may be turned on after the installations are complete and the applications have been run once with UAC turned off.
b. To turn off UAC in Windows Vista:
i. Open up Control Panel, and type in “UAC” into the search box.
ii. Click on the link for “Turn User Account Control (UAC) on or off” 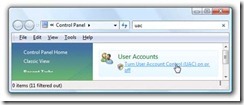
iii. On the next screen you should uncheck the box for Use User Account Control (UAC) to help protect your computer, and then click on the OK button. 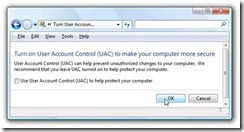
iv. You will need to reboot your computer before the changes take effect.
c. To turn off UAC in Windows 7:
i. Type UAC into the Start menu search box or open Control Panel and type UAC into the Control Panel search box.
ii. Drag the slider all the way down to Never notify and then click the OK button. 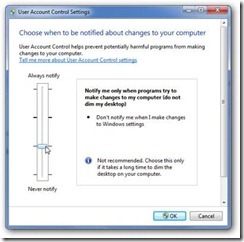
iii. Click the OK button.
iv. You’ll need to reboot your computer before the changes take effect.
d. To turn UAC back on, repeat the steps as listed previously but this time either checking the “Use User Account Control (UAC)…” (Windows Vista) or moving the slider back up (Windows 7).
5. Reboot when prompted. If you are prompted to reboot after preforming an installation step, please do so. There may be file registrations that need to take place or files in use when the install was performed. The reboot allows this to happen correctly.
When you upgrade to Management Reporter and Dynamics SL 2011 (best set of improvements since Microsoft took over the Dynamics SL product)-you will no longer have to worry about the financial reporter not being supported in a 64-bit environment.
Thank you for reading this post and we hope this gets you through what you need to do before you do a very worthwhile upgrade to Dynamics 2011.


