Welcome to Part 2 in a series of blogs on how to make mass changes and additions to data in Dynamics NAV. If you missed Part 1, you can read it here.
In this blog we will look at the first two of 10 steps in making a mass change or addition to data in NAV, specifically:
- Identify what you want to change or add to NAV, including which fields and tables are involved. a.) For changes to existing records, create a mapping table to identify under what circumstances certain records will get updated. b.) For new records, identify all the fields that need to be set up to add in the new data.
- Go into RapidStart and create your configuration package and download the tables and fields identified. Export this to Excel.
Let’s get started!
Step 1
For this example, let’s say you want to modify the Cash Flow Payment Terms field so that all Customers who are NET 15 days in reality are NET 30 days for cash flow forecasting purposes.
Step 2
In NAV go to the search box in the upper right corner, type “Config” and select the last item in the list Configuration Packages:
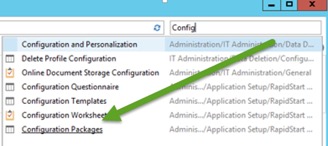
This can also be found under /Departments/Administration/Application Setup/RapidStart Services for Microsoft Dynamics NAV/Configuration Packages
Once on the Configuration Packages page in NAV, create a specific Configuration Package to get the Customer table in NAV by selecting “New.”

Now you will see something like this:

Please enter a short name and description in the Code and Package Name fields. The remaining fields under General can remain unchanged or blank.
Under Tables, hover your mouse over the “0” under Table ID until it looks like this:

Click on the drop down and a list of Objects will pop up (image below). These objects are the tables of data within NAV.
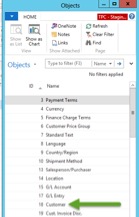
Then select the table with which you want to work. For our example, please select “18 Customer.” If the exact table number is already known, then you can manually enter the table number in where the zero was. In this case, typing “18” where the zero was would provide the same table.
Regardless of which method is used to add a table, click on “Refresh” in the Home Ribbon. That will update the whole screen to look like this:

We now have our table. However, we are currently including all the available fields of the table, and we do not need all of them for our purposes. From the selected table we need Customer Number, Name, Payment Terms and Cash Flow Payment Terms. To select these fields, go to the No. of Fields Available value and hover the mouse there until the number is underlined. Once it is underlined, click on the number.
Clicking the underlined number will bring up the following pop-up box (see below). Once the box pops up, please click on “Clear Included.” This will uncheck almost all of the boxes under the Include Field column.
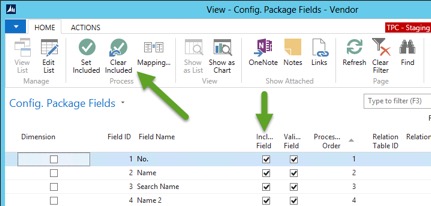
The one included field that remains checked is the No. field. This is the primary key field for this table and so cannot be unchecked. For some tables, there will be more than one field that is a key field and needs to remain checked, but NAV will manage this for you.
Now we need to start adding the fields that we want to include. To change the Included Field check box, first single-click on the “Include Field” box for the Name field. At this point it should look like the image below. (Notice that the area around the check box is a light blue color or lighter color than the rest of the line.)
![]()
Next double-click in that same box. The area around the box should turn white like the image below. Now the check box can be checked or unchecked.
![]()
Check the “Included Field” box next to Name. This can be helpful in knowing to whom that customer number is assigned.

To find the Payment Terms fields, we are going to filter the fields instead of hunting through the entire list. Go to the filter, change the filter column to Field Name and enter in “Payment Term” into the criteria.
![]()
This will filter the entire list of fields down to only two fields that have “Payment Term” in their name. The other fields are still there; they are just temporarily hidden while the filter is applied.
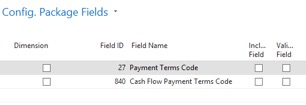
Please check the “Include Field” box for both of these fields.

You probably have noticed that the Validate Field box is also checked when checking Include Field. Validation makes sure that any values imported into NAV at the end of this process are valid. I suggest you always leave Validate Field checked for all included fields.
Once you have selected these two payment terms, click on the “OK” button in the lower right. Then click on “Refresh.” Notice for the Customer table, the value under No. of Fields Included is now 4. If there is another value here, that means a different quantity of fields has been selected. If the value under No. of Fields Included does not seem correct, then please review the selected fields.
Once the process for the Customer table has been completed, the configuration package should look like this:

Step 2 Continued
From the configuration package, we want to export to Excel. First, go to the Actions Ribbon and select “Export to Excel.”
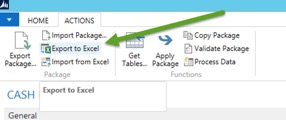
You will get this message box:

Click on “Yes.”
Next you will be asked to choose where to save the file. Give the file a name and save it as an Excel File.

NAV will take a little time to download the tables and create a spreadsheet with a tab for each table. Once the file has downloaded, we will work in Excel for a little while.
Step 3
Before we do anything with this Excel file, we must make a copy of the file so we have a backup in case we need to revert settings to the original. In Excel, do a “Save As…” and save a copy with a name that differentiates it as the backup.
Step 4
Name the file which will carry the new or changed records stating that it is the “new” or “updated” file. From this point forward in these blog posts, only use the “updated” copy of the Excel file for the mass changes. In fact, it’s a good idea to close the backup file to avoid any confusion.
Now, with the new/updated Excel file we are using we want to create a mapping so that if the customer has X payment term, then the cash flow payment term will be Y. We want to do it that way because changing each customer record one at a time would be too time-consuming, and changing every customer record to the exact same cash flow payment could cause inaccuracies.
First we need to create a new sheet or tab in Excel. Click on the “+” button as in the image below. We will use this sheet to create the mapping and use it in the Customer records.
![]()
Next, go to the Customer sheet in the Excel file and select column C, being sure to select the entire column.

Copy column C into the clipboard by either typing “Ctrl-C” or right-clicking in the highlighted range of column C and selecting “Copy.”
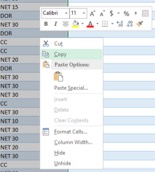
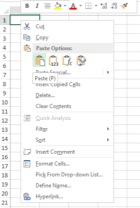
Now go to the new sheet that you just created in the Excel file, and paste the clipboard by either typing “Ctrl-V” or right-clicking and selecting “Paste.”
After pasting the data into the new sheet, go to the Data Ribbon, then Data Tools and select “Remove Duplicates.”
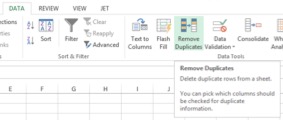
The pop-up message box below will appear. Check the “My data has headers” box and click “OK.”
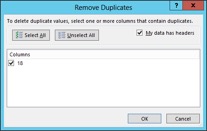
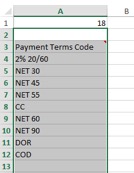
You will get something like this:

This reduced the list of Payment Terms used in the Customer table down to only the values that are actually used in that field of the table (below).
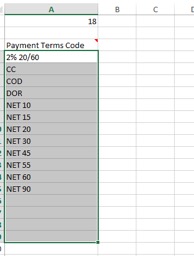
To organize the list, please sort alphabetically as it will be easier to work with this way.To organize the list, please sort alphabetically as it will be easier to work with this way.
Step 5
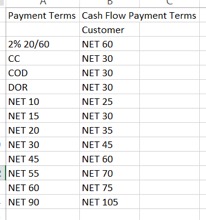
Excel has a number of ways to map changes of data. One way is to look at the list of Payment Terms and then in the column to the right of it, enter in the new Cash Flow Payment Terms. After that you can use a VLOOKUP in the Customer data tab to map new and old terms.
That would end up looking something like this in the mapping tab:
And something like this in the Customer data tab:

The VLOOKUP in the image above looks a bit different than a normal VLOOKUP because the elements of the formula are looking into the table that was downloaded from NAV. Regardless of this, the VLOOKUP functions normally so the results are still the same.
You could also use other Excel formulas, such as IF. It all depends upon the change you want to make, how you want to make that change and what functions you are most comfortable using. As long as the result in Excel is correct, the method does not matter. Please find a helpful link here on the VLOOKUP function in Excel.
Once you have entered in the formulas and have derived what the new values for the Cash Flow Payment Terms should be, then copy the new Cash Flow Payment Terms into your clipboard and paste/special values into the Cash Flow Payment Terms.
In the example above it would be the values in column F and you would paste/special values into column D (without changing the header rows of column D).
Once the correct values are in the Cash Flow Payment Terms, please click on the filter for Cash Flow Payment Terms Code to make sure all of the results look correct (image below). Make sure that there are no error messages, like “#N/A” and check that the Blank Values are correct too.
I4.4
If there are any “#N/A” errors, these indicate that a matching value was not found so please review the formula and the mapping values. The values in the map have to match exactly for the VLOOKUP to work.
If there are blank values, this means that the formula found a corresponding match but that the match does not have an updated value. Please check the mapping values to make sure every record is mapped appropriately.
At this point, please make sure to save the file.
In this blog post we demonstrated a way to map changes in Excel and save the updated file. All of the instructions above were about how to prepare to change existing records.
Step 6
Before we go further, I’d like to explain one concept in a little more detail. When we import the Excel file into NAV, at the time of import we are copying the data from Excel into NAV’s configuration package. We are not moving the data directly into the tables yet. When we get to the step to apply the data, that’s when the data moves from the configuration package into the table. Does that make sense?
An imperfect analogy is that importing the Excel file is similar to loading the dishwasher with dishes. You haven’t added the detergent yet (validation step) or started the cleaning cycle (applying the import). At the end of the process, you will have clean dishes or in NAV’s case, updated data.
The first thing we need to do is import the data into Excel. Let’s go back to our configuration package that we created previously:

Next, go to the Actions ribbon and select “Import from Excel.”

Alternatively, you can also go to Excel under Tables and select “Import from Excel” there.

Find and select the file you want to import and click on “Open.”
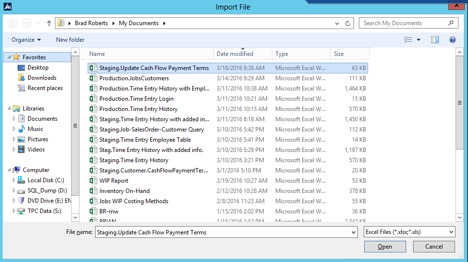
You will then get a message box like this:

Please wait for the importing process to finish.
When it’s finished, click on Refresh. You will notice that the No. of Package Records field no longer shows a zero value. This shows that you have successfully loaded this configuration package with data.

Since we are only doing updates to existing records, notice that the No. of Package Records equals the No. of Database Records. If No. of Package Records is greater than No. of Database Records, then applying this package will create new records, which might not be your intention. If the number of records is not the same in the two columns, review your work to evaluate which records in Excel should be removed/changed/added and re-import the updated Excel file.
Step 7
This step will check on table relationships, so that the values you are adding in that have a table relationship are in the related table. In our example, we will check each Payment Term to make sure that it exists in the Payment Terms table. To validate the package, go to the Actions Ribbon and select “Validate Package.”

Depending upon the file, this process might go quickly or take a long while. Generally, larger files will take longer because there is more data to check.
When you click on “Validate Package,” you will get the message box below. Click “Yes.”

Next you will get a message box that says:
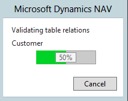
Once completed, if there were no errors, a message box will appear with the number of tables processed:

If there are errors, the number will be in red under “No. of Package Errors.” Hover the mouse over the number and click on it when it underlines. A new message box will open up allowing you to “Show Errors” to investigate what needs to be reviewed/fixed.
If the error requires a fix to the data, then you will need to fix the data in Excel, re-import the Excel file and validate it again. NAV is not aware of any changes in the Excel file so you might need to update data in another table to fix the error. This can be done either manually in NAV or by completing a separate Configuration Package if there’s a lot of additional data to load. After any changes are made to the Excel file, the file will need to be re-imported into NAV to get those changes applied to NAV.
Step 8
Once any errors are resolved, the next step is to apply the package. Click on “Apply Package.”

You will get this message box:

This is your last chance to NOT apply the changes into NAV. Click “Yes” if you want to apply the package, which updates the data in NAV. After clicking “Yes,” you will get a message box that NAV is applying the package. Once it has finished, you will get a message box summarizing the number of tables processed and number of errors found.
If there are errors, then the No. of Package Errors field will show up in bold and red in the Configuration Package. Click on this field to figure out the best next step forward.
One way to tell if the data has been applied is to look at the No. of Package Records field. After applying the data with no errors, this field should change to zero (see image below).

Now, as a final check, let’s look at some customers. In Customers under Payments, you will notice that the update worked:

Step 9, option 1 – Testing NAV Changes with Visual Inspection
Visual inspection amounts to randomly picking a representative sample of records and verifying that those records have the appropriate values in NAV from the file that you used to upload and apply the changes.
A representative sample can either be a random selection of a number of records or you can cluster similar records together, such as all items that have the same Item Category Code and are purchased. Then you must pick one of the items from that cluster to represent the cluster and compare that item’s values in NAV to what that item’s values are in the spreadsheet that you uploaded into NAV and applied.
Another way to do visual inspection is if, for example, a number of records in a row were updated or newly added, simply roll through each item in that range visually and quickly check a set of fields to make sure the values are correct.
The advantage of visual inspection is that the amount of time and effort it takes to complete the task is less than for analytical comparison. The disadvantage of visual inspection is that you are only inspecting a portion of some of the records, not all of them. Even if you are reviewing a statistically significant sample size, errors could still get through without being detected.
Step 9, option 2 – Testing NAV Updates with Analytical Comparison
The other way to test is through analytical comparison. Basically put, analytical comparison uses formulas and filtering in Excel to help you identify differences between the two groups of data.
There are numerous ways to do an analytical comparison. For me, the easiest way to do a comparison is to copy the data file that contained the new/changed records into one tab of a new Excel file. Then, in another tab of the same new Excel file, copy and paste the table that was changed. Finally, copy the tab of the new/changed data records into a new tab and use that to compare changes.
Since Excel is a powerful tool, there are as many ways to accomplish this task as there are users of Excel.
I typically use the VLOOKUP and MATCH functions of Excel to determine where any values have not changed. The MATCH function is used within VLOOKUP so VLOOKUP knows how many columns total to look in the array. This can be helpful if you are only updating a few fields but have pulled down the whole table for comparison.
Here are two simple tutorials on using the VLOOKUP and MATCH Excel functions:
https://support.office.com/en-us/article/VLOOKUP-function-0bbc8083-26fe-4963-8ab8-93a18ad188a1
https://support.office.com/en-US/article/MATCH-function-E8DFFD45-C762-47D6-BF89-533F4A37673A
Once you have compared the changes you wanted to make with how the new table looks, you can investigate any differences. Some values cannot be changed once a master record has a transaction using it.
Step 10 – Production!
Once you have reconciled and determined what to do with any differences found in testing, you can now proceed to repeating the process in your production environment. It is always important to test what you are thinking of doing in a non-production environment first because once data is added or changed in production, it can become more difficult to fix any issues that arise.
Congratulations! You have successfully changed mass records in NAV.
I hope this series on NAV’s RapidStart capabilities has been informative and will help you with your mass change/mass data addition needs in Microsoft Dynamics NAV.
[button link=”https://www.boyerassoc.com/contact-us/” color=”default” size=”” stretch=”” type=”” shape=”” target=”_self” title=”” gradient_colors=”|” gradient_hover_colors=”|” accent_color=”” accent_hover_color=”” bevel_color=”” border_width=”1px” icon=”” icon_divider=”yes” icon_position=”left” modal=”” animation_type=”0″ animation_direction=”down” animation_speed=”0.1″ animation_offset=”” alignment=”left” class=”” id=””]Contact Us Today [/button]


