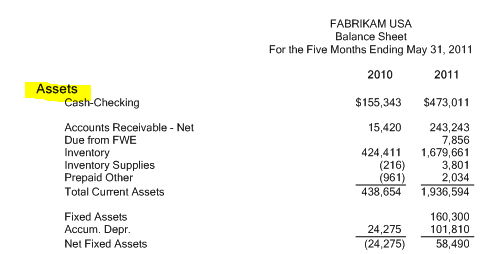
Most of you already have a balance sheet that you are using for your monthly reports. The typical process is a combination of running a report in Management Reporter and then exporting to excel to make formatting adjustments or to correct the dollar amounts so they balance. Below are some tips to avoid having to export to excel to achieve a completed report straight from Management Reporter.
1. Separating Your Report onto Two Pages: Balance sheet reports are a good example where you would want to separate the Assets section from the Liabilities and Equity section. To do this, enter the “PAGE” function in the Format Code section of the row definition just above where you would want to start the new page of the report.

2. Auto Indentations on the Report: Indenting header sections of the report will make your balance sheet look more appealing to the reader.

To do this, you will need to add an “LFT” in the Format Code section of the row definition on the row where you want the description to left align.

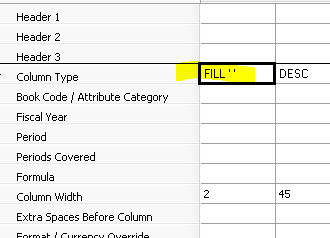
You will also need to add a “FILL” to Column Type in the column definition to indent all the rows except the one in which you used the “LFT” format code.

3. Side by Side Balance Sheet: Do you have a simple balance sheet where two pages would not look right? Try doing a side by side report.

To accomplish this, you will need to add a “COLUMN” Format Code before the section that you want to have on the other side of the page. Don’t forget to adjust the page settings on the report definition or it will continue to print on two pages.

4. Processing Order: Have you ever had your report rounded and not balance, off by a few dollars? Check the Processing Order on the Setting tab of the report definition. If you are rounding first, the adding rows 10.50 and 10.50 will be 22.00, but if you change the priority the result will be 21.00. This may be the cause for your variances.

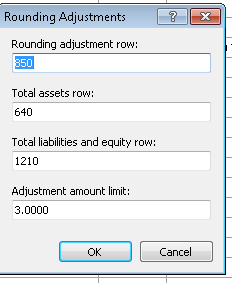
5. Rounding Adjustments: If you want a more automated solution to ensure your balance sheet sections balance, try using the Rounding Adjustment tool in the row definition. This will automatically balance your Asset and Liabilities/Equity sections and warn you if the adjustment is greater than what you would allow. When you have your row definition open, go to Edit and select Rounding Adjustment.

The first box is where you define what row any adjustment should go; then, define the two sections of your balance sheet. The last piece is to define what amount you are comfortable with for rounding without a warning.
Looking for tips on building cash flow statements? Check out our previous blog post.
Need more assistance with writing your Management Reporter reports? Check our events page for upcoming classes on Management Reporter.


