In case you haven’t heard, Google made changes last year to what they call “less secure apps.” Due to those changes, new Gmail/G Suite SMTP configurations within Microsoft Dynamics 365 Business Central will not work successfully unless some changes are made on the client side ahead of time.
(Existing Gmail/G Suite SMTP connections should still work just fine.)
Below is a step-by-step guide to setting up Gmail SMTP in Business Central:
Step 1
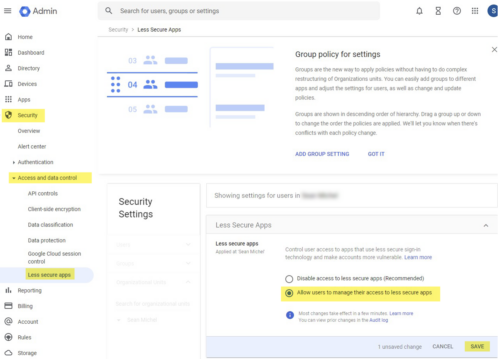
- Go to the workspace admin portal (https://workspace.google.com).
- Select Security on the lefthand menu.
- Select Access and data control.
- Select Less secure apps.
- Click the radio button that says Allow users to manage their access to less secure apps.
- Save.
Step 2
- Go to the shared email account for the account that will be used for outgoing Business Central emails https://myaccount.google.com).
- Select Security from the left menu.
- Scroll down to Less Secure Apps.
- Select Turn on Access.
- Save.
Set Up Gmail SMTP in Business Central
Step 1
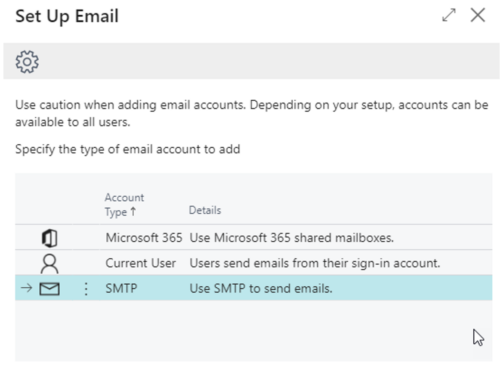
- Go to Set Up Email.
- Select SMTP and then Next.
Step 2
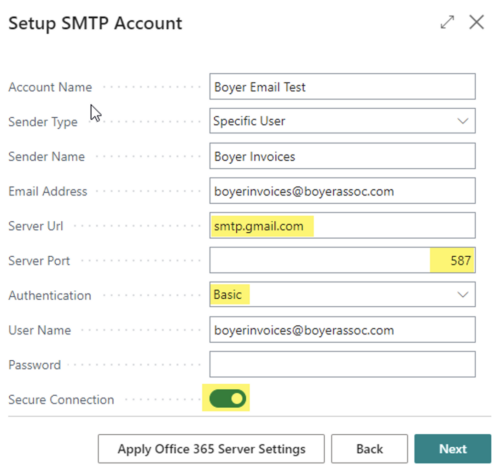
- Account Name is the nickname you’d like this email account to be called in Business Central.
- Sender Type is Specific User.
- Sender Name is the name you’d like the user to see, in addition to the email address.
- Email Address is the email address for this account.
- The Server URL for outgoing Gmail is smtp.gmail.com.
- The Server Port for outgoing Gmail is 587
- Authentication should be set to Basic.
- User Name is the email address.
- Password is the password for this email address.
- Secure Connection should be toggled on.
Step 3
- Toggle on Set as Default if you’d like outgoing emails to default to this email account.
- Select Send Test Email if you’d like to test it.
Now you know how to set up Gmail SMTP in Business Central. Contact us if you need additional assistance.


