Despite your best efforts to keep accurate accounting records, the occasional error is inevitable. When that occurs, how do you correct an invoice within Microsoft Dynamics 365 Business Central?
The process to correct a posted document or transaction in Business Central depends upon the origination of the transaction. If you are trying to correct a posted invoice (which is a document), then you must use the Correct function. This is true for both sales and purchase invoices. Below are instructions walking you through the options available to correct a posted invoice on the sales or purchasing side of your business management software.
Correcting a Posted Sales Invoice
On the Posted Sales Invoice page you have the following choices under Actions, Correct:
- Correct – Reverses the posted sales invoice and creates a new sales invoice that you can then correct before posting.
- Cancel – Creates and posts a sales credit memo that reverses the posted sales invoice.
- Create Corrective Credit Memo – Creates a sales credit memo that you can modify and then manually post, which reverses the posted sales invoice.
Using Correct to Reverse a Posted Sales Invoice
- Type “posted sales invoice” in the search bar.
- Find the posted sales invoice you want to correct.
- On the Posted Sales Invoice page choose “Correct,” then “Correct” (again). The following message will appear:
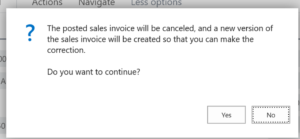
- Click “yes.” In this scenario, a new invoice is created. On this new invoice you can make the changes necessary and then post.
- The initial invoice that was canceled will remain in the system for auditing purposes, but the following fields are updated on the original invoice: Invoice Canceled = Yes, Corrective = No and Closed = Yes. This indicates that the original invoice is closed and canceled, but it is not a corrective invoice. A sales credit memo is automatically created and applied/posted to that original invoice. On the posted credit memo header the field Corrective = Yes.
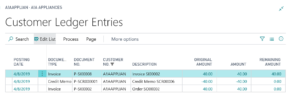
- NOTE: All this can be seen in the customer ledger entries. Nothing is done in Business Central without tracking.
- As you can see below I corrected the original invoice P-SI00002 and as a result, the system made two additional entries, one for the new invoice and one for the credit memo. Keep in mind that you can always tell if something has been fully applied or closed when the Remaining Amount = 0.00.
Using Corrective Credit Memo to Reverse a Posted Sales Invoice
- Type “posted sales invoice” in the search bar.
- Find the posted sales invoice you want to correct.
- On the Posted Sales Invoice page choose “Correct,” then “Create Corrective Credit Memo.”
- You can make any adjustments necessary on the credit memo. Then choose “Post.”
- The system will create a credit memo and apply it against the invoice. It does NOT create a new invoice.
- The Customer Ledger entries below reflect the two entries in our example: the original invoice and the credit memo. The Remaining Amount = 0.00 on both indicates that they have been applied to each other.
 Note: From the Customer Ledger entries you can always see the application. If Remaining Amount = 0.00, that means some transaction was applied to satisfy the transaction. By simply highlighting the entry and choosing Navigate, Entry, Applied Entries, you can easily see what was applied to this transaction. You can see these applications from any angle, meaning that you can look at a payment to see what invoices it was applied to or you can look at an invoice to see what payments or credit memos were applied against it.
Correcting a Posted Purchase Invoice
Next, let’s take a look at your options on the purchasing side. The functionality that exists on the purchasing side is as follows:
- Correct – Reverses the posted purchase invoice and creates a new purchase invoice that you can modify before you post.
- Cancel – Creates and posts a purchase credit memo that reverses the posted purchase invoice.
Using Correct to Reverse a Posted Purchase Invoice
- Go to the Posted Purchase Invoice list page.
- Highlight the posted purchase invoice and open it.
- Click “Actions,” “Correct” and then “Correct” (again).
- The following message will appear:
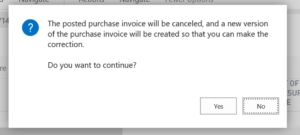
- Click “yes.” The system will create a purchase credit memo, apply it to the posted purchase invoice and create and display the new invoice so that you can make modifications before posting.
- Go to the Vendor Ledger Entries and you will see the following:

- As you can see in the example above, the system created the purchase credit memo PCM100025, applied it against purchase invoice PI100816 and created a new purchase invoice PI00817, which I then modified and posted. The remaining amount against the original invoice and credit memo is zero, meaning they have been fully processed and applied.
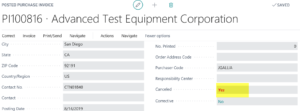
- If I were to drill down into those individual entries again, I would see that the original posted purchase invoice now shows canceled (see highlighted image below), the newly created and applied posted purchase credit memo shows corrective, and the newly created invoice indicates “no” in both fields.
Using Cancel to Reverse a Posted Purchase Invoice
- Go to the Posted Purchase Invoice list page.
- Highlight the posted purchase invoice and open it.
- Click “Actions,” “Correct” and then “Cancel.”
- The following message will appear:
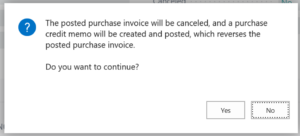
- Click “Yes.” You will be given the option to open the posted credit memo. Similar to our previous example, the posted purchase invoice will show “Yes” in the Canceled field (see highlighted image below) and the posted purchase credit memo will show “Yes” in the Corrective field. No new purchase invoice is created.

NOTES:
As you can see, the above processes work if the posted purchase invoice has not yet been paid or the posted sales invoice does not yet have cash applied against it. If you wish to make a correction after either of those activities has occurred, you will first need to perform the following tasks:
- For the purchasing side you will have to go to the bank account and financially void and un-apply the check. The posted purchase invoice will then have a remaining balance if you look at the Vendor Ledger entries. You will then be at the stage to perform the above process.
- For the sales side you will have to un-apply and refund the cash application to reset the posted sales invoice with a remaining balance. Then you can perform the steps above.
For more helpful tips on how to work within Dynamics 365 Business Central, sign up for our blog to have our latest posts delivered directly to your inbox.


