Back in May of this year, I first wrote about Microsoft Dynamics GP adding Document Attachments into the core product. This post is a follow-up to that article. Now that Document Attachments have been enabled, you can setup attachments to automatically flow between areas of the accounting system.
Enabling Document Attachment Flow in GP 2013
A key feature in the new Document Attachments feature in GP 2013 is the ability to have attachments ‘flow’ through the accounting process. This is fairly straightforward. What is meant by ‘Flow’ is that anywhere a card type item is used, such as an Item, Vendor, or Customer, the attachments associated with that card type will be added as a reference in the new area. A very simple example of this is if you create an attachment on an Item, and then create a Sales Order that uses that Item, a reference to that attachment will be made in the Sales Order and available for viewing there.
Setup Options
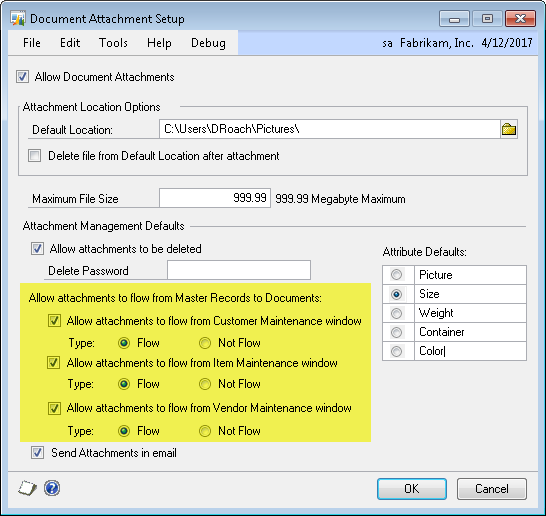
On the Document Attachment Setup window, there are three checkboxes that enable attachment Flow. Each of the checkbox options is for a different type of card data – Items, Vendors, or Customers. This allows the user to enable attachment Flow for the specific type of card data that they want the flow process to run.
Walkthrough Example Using Fabrikam
For this example, it will be assumed that you have read the original blog post on setting up the Document Attachments Feature in GP 2013. An example of the setup window follows and the key fields on the window pertaining to ‘Attachment Flow’ are highlighted in yellow. To enable the attachment Flow, the specific card type needs to be checked and the Type needs to be setup as Flow. This can be overridden on a per-attachment basis, but as an overall setting, it should be turned on to enable it.
Step 1: Adding Attachments
Any transaction type can have a document attached to it, but the Flow feature is intended to be used with attachments at the card level, such as attachments for a specific customer. Putting the attachment on the card data and turning on the Flow feature means you only need to attach the document once and it will be available on any transaction type that is created using that card data.
- Open the Customer Maintenance Window: Cards → Sales → Customer.
- Bring up the Customer ID (in this example, I used ADAMPARK001).
- In the upper right corner of the Customer Maintenance window, you will see a paperclip icon. Press the paperclip icon to open the Document Attachment Management window. This is where you add/delete/update attachment.

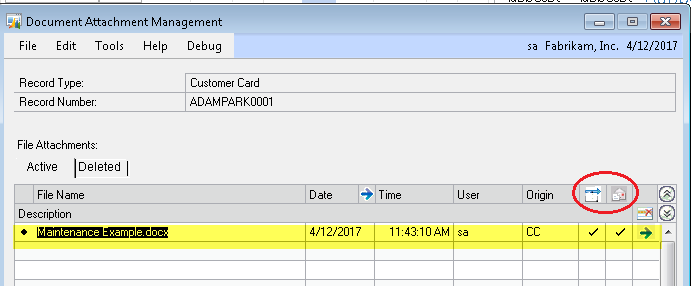
- You will see the Document Attachment Management window and the scrolling window are blank, as no attachments have been added yet. At the bottom of the window on the right hand side, you will see an Attach button. This is used to add attachments to the specific customer. Press the Attach button, which will open a file navigation window, allowing you to select a document to attach. For this example, I will navigate to a sample maintenance document called Maintenance Exmple.docx. When you select the document, GP will copy this document and save it in the SQL database. Upon returning to the Document Attachment Management window, you will now see the attachment displayed in the scrolling window.

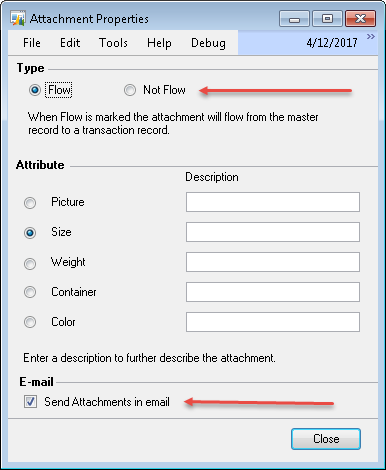
- The icons on the upper right of the scrolling window (circle in red) indicate two different things. The white page with the arrow on it indicates that the document is marked to Flow and the email icon indicates if the attachment can be emailed as part of a transaction. Press the expansion arrow at the end of the attachment line to see the details associated with this attachment. The key fields here are the first and last fields. The type option will default to Flow, meaning this attachment will be available on transaction entries. The E-mail option indicates that this attachment can be e-mailed out. This allows the user to decide on a per-attachment basis if the attachment should Flow, and if it should, can it also be included on e-mails. For this example, I have allowed both options.

- Press the OK button to close the window and return to Customer Maintenance. The Customer Maintenance window will now have the paperclip icon updated to indicate that there are attachments associated with this customer.

- Save and close the Customer Maintenance window.
Step 2: Flowing Documents to a Sales Transaction Order
After attachments are created and ‘Flow’ is enabled for the attachmens, you can create transactions using that card data and the attachments will populate automatically. This example will create a Sales Transaction order for ADAMPARK001 and show the attachment flow.
- Open Sales Transaction Entry: Transactions → Sales → Sales Transaction Entry.
- Create a new Order.
- Enter the Customer ID (e.g., ADAMPARK001 again in this example) and tab off the field.
- Notice that the paperclip icon in the upper right corner now shows the paperclip with a sheet of paper, indicating there is an attachment.

- After you save the Sales Transition document and bring it back up, you can click on the paperclip icon to view the Attachment Management window.
Summary
That is all there is to creating an attachment and getting it to Flow to transaction documents. In the next posting, I will address e-mailing attachments associated with a transaction document. The keys here are making sure the setup options allow Flow and setting the Flow option correctly when adding attachments, if it does not default the way you want it to (Flow/Not Flow).
For additional tips and tricks regarding Dynamics GP and ERP products, visit our blog.


