


Follow these five steps to set up a new company in Dynamics 365 for Financials:
- After logging into your Dynamics 365 for Financials instance, search for and open the Companies page.
- Click the New button on the Ribbon.
- Assign a Name to the new Company. Note: After you specify the Name, Dynamics 365 for Financials will take a while to create the new Company.
- Assign a Display Name to the new Company.
- Specify if you want to use the Enable Assisted Company Setup tools. See the notes below for information about how to use this field.
After opening the Companies page, you’ll see the following:
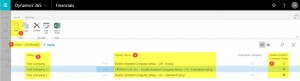
Enable Assisted Company Setup Options
You have two options within this tool:
Option 1 — Blank: If you leave this field blank, the company that was inserted is left completely empty. Note: Starting from this point will leave you with a lot of configuring to be done.
Option 2 — Checked: If you put a checkmark in this field, a configuration wizard will open when you log into this company for the first time, and you’ll be asked which of the two following setup options you want to use:
Standard Setup:
If you choose this option, lots of preconfigured data will be set up automatically, including a Chart of Accounts, Posting Groups, No. Series, Data Templates, etc.
Note: Starting from this point will save a lot of configuration time, but these configuration may not be exactly what you want. For example, the Chart of Accounts may not be structured the way you want and you may need to restructure it.
Evaluation Setup:
If you choose this option, a CRONUS USA, INC. Company will be created. This Company has sample data in it (including posted transactions), which you can use to learn about Dynamics 365 for Financials configurations and test transactions.
Note: You do not want to use this option if you’re setting up a Company you’re going to use for recording your business activity.