Everything is setup and now you want to send a document with attachments to the customer
So the first two posts – Part 1 and Part 2 – showed you how to setup attachments, enable email for the customer address, and allow attachments to ‘flow’ to the new Sales Orders. Now, it is time to send the sales document to the customer and include the attachments.
For this example, I will use the prior sales document that I created for Adam Park. That customer has an attachment on it which flowed to the new sales document, and the item that I have put on the order has an attachment on it that also flows to the new sales document.
Open Sales Transaction Entry
Since I already have the document defined, I will bring it up in Sales Transaction Entry. For the user, you would be creating a Sales Document, picking your customer, and adding your line items. You will see in the upper right corner of the transaction window that there are ‘attachments’ because the paperclip icon will show the white paper under it. To see the line/item attachments (icon), you need to go to the item details window and you will see it there.
Selecting Attachments to Email
Attachments do no automatically get sent out on the email to the customer, and the user must select which attachments will be sent. This is due to the fact that you may not want all the attachments to go out to the customer. The customer level attachment might be pricing or contract information, for example, that you don’t need to send to the customer. The line item attachments are details you want the customer to receive. Examples of what you might send out are things like a picture of the item, warranty information, or a product manual.
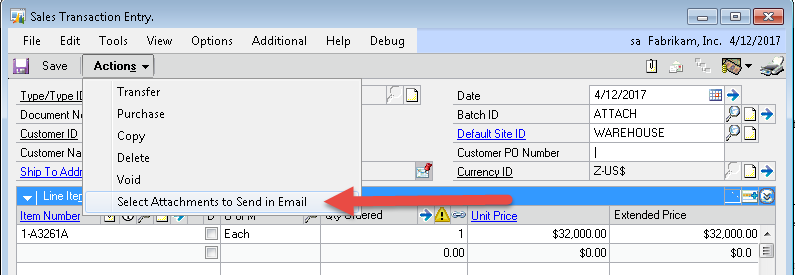
When you have the sales document up in Transaction Entry, under the ‘Actions’ option, you can select ‘Select Attachments to Send in Email’. This will open a window allowing you to pick which attachments will go out. The selected attachment information is persisted (saved) with the document and future emails of these documents will use those settings.
Select Attachments to Send in Email Window
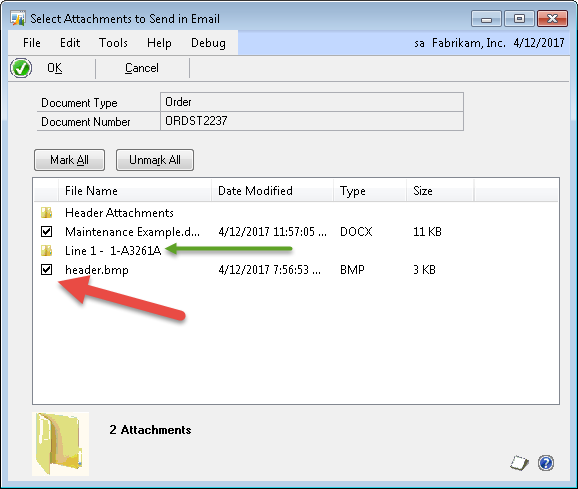
This window shows you all the available attachments for this document and at what level those attachments are (header/item). Simply mark (check) the attachments you want included in the email and OK the window.
Once you’re back on the Transaction Entry window, all you need to do is select the ‘Send Document in Email’ icon in the upper right corner (looks like an envelope) and the Sales Document will be sent out with the attachments you selected.
Send Error
If you select the ‘Send Document in Email’ option and you receive an error message that you do not have a ‘To CC’ address defined, then the customer ‘Bill To’ address for the document is missing the email information which is setup on the customer address card by selecting the ‘Internet Address’ icon. If you select the customer expansion button on the sales document, you will see the ‘Bill To’ address and can then use the zoom button to open the customer address card.
For additional tips and tricks regarding Dynamics GP and ERP products, subscribe to our blog.


