One common customization for screens in Microsoft Dynamic SL is to add fields to store non-standard data. Depending on the quantity of additional information (and its type), this can be either very simple or quite complex. Let’s start at the beginning.
First, a general word on customizations – screens can be customized at multiple levels. The basic levels are All Users, One Group, One User, and Self. (It is possible to adjust the level numbers to gain additional layers, but normally, that is more trouble than it is worth.) Most customizations will be done at the All Users level.
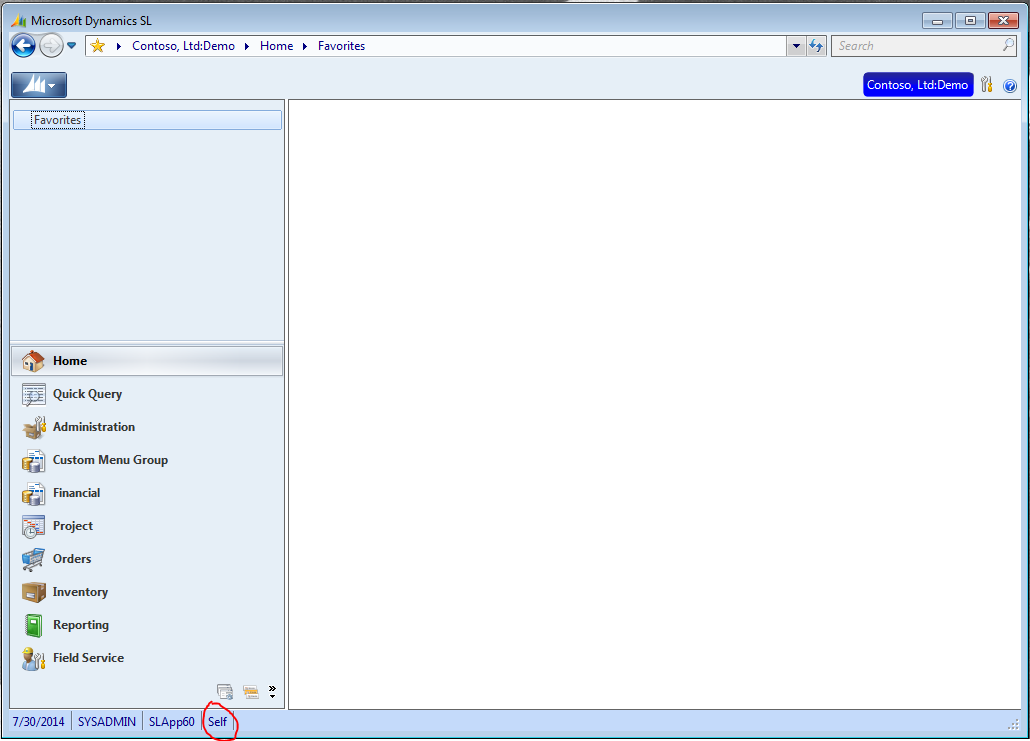
The first step is to select the proper level. This is done by double clicking on the customization level at the base of the menu window (shown below). Note that no screens can be open when you open this screen.
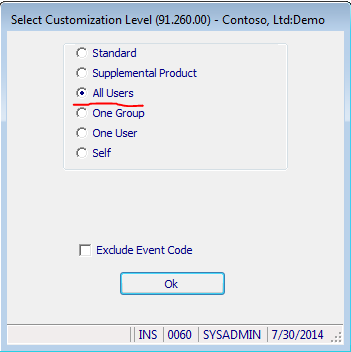
That will bring up the Select Customization level screen (assuming you have rights to the screen). This screen allows you to select the customization level with which to work. (Note: Standard will ignore any customizations – it is a means to test issues on the standard screen without losing your existing customizations.) There is also a check box to Exclude Event Code. That is used to allow you to open a customization containing code causing the screen to crash while opening (to avoid a situation where you can’t access the code to fix it). In most cases you should ignore it. Press the OK button to accept your changes.
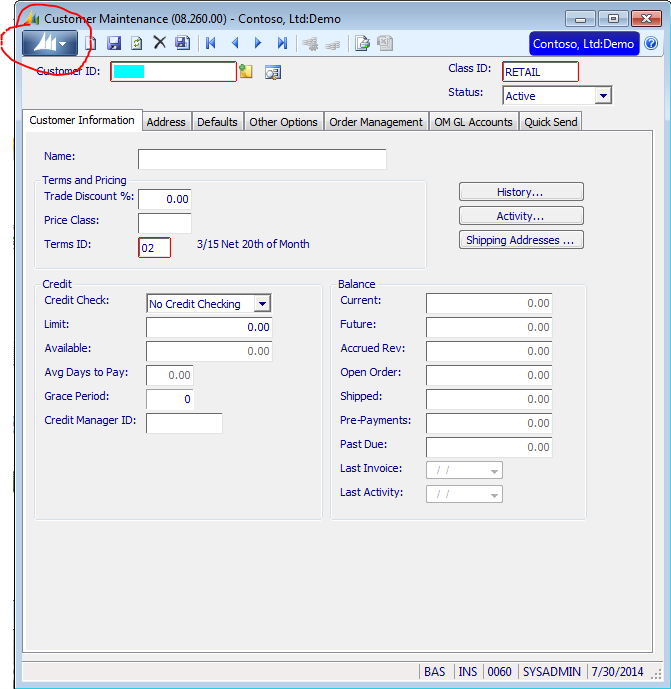
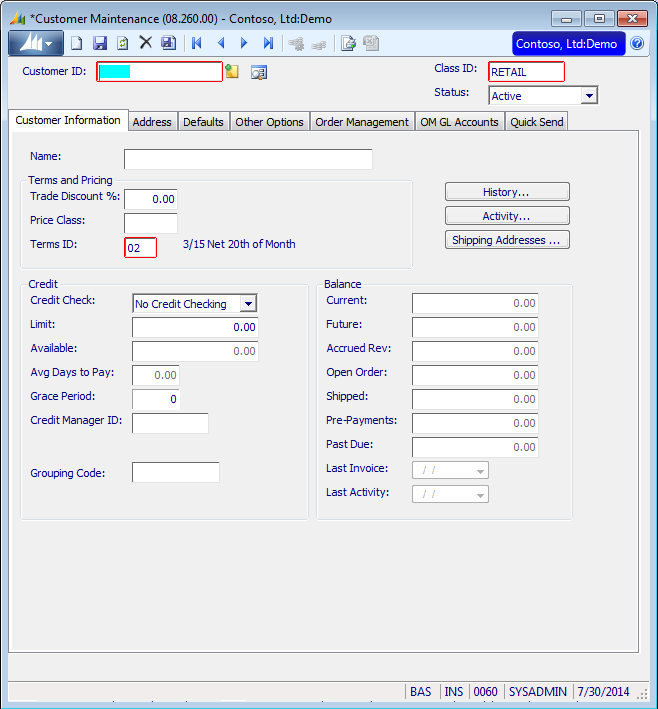
Now we can go forward with customizing the screen. For this example, I will use the Customer Maintenance screen. Below is the basic screen. Notice that the window title bar caption does not contain an asterisk at this point.
There are 8 user fields in most SL tables – two 30 character fields, two 10 character fields, two number fields (floating point), and two date fields. A few tables have more, and some have fewer (or none). When possible, using one of these user fields is your best choice; this is why they were included in the tables in the first place. I will add one of the 10 character fields for this exercise.
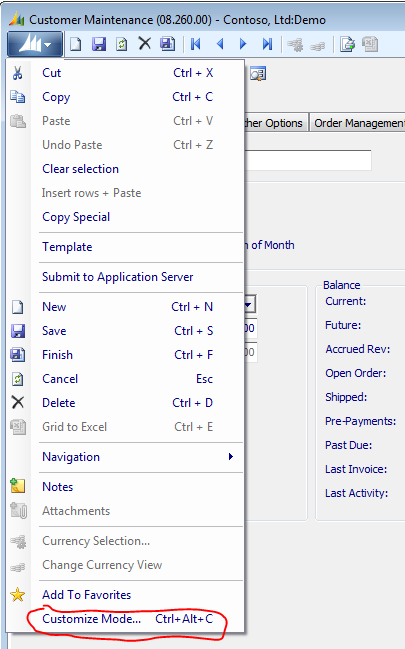
When you are ready, press the blue sail button on the screen to open the menu. Select the Customization Mode option at the bottom of the list. (Note: This can only be done when you only have a single SL screen open.) It is possible to accomplish the same result by pressing Ctrl+Alt+C. In fact, it will be necessary to open customization mode that way if you are working on a sub-screen such as the Customer Activity screen. (In the example, the first 5 digits of the screen number 08.260.04 indicates whether the screen is part of the same program or a separate executable.)
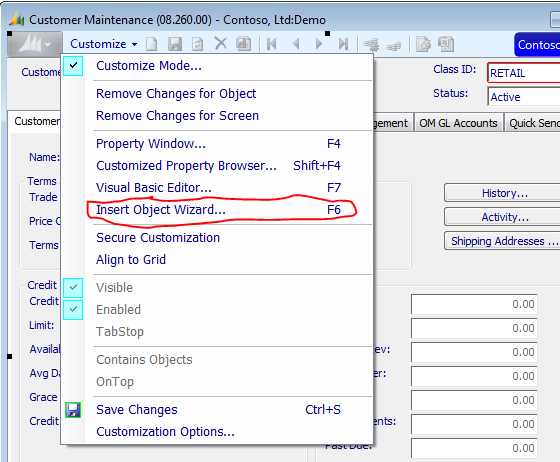
Entering customization mode adds a new item to the menu at the top of the screen. This contains several useful tools for customizing the screen. They can be accessed using function keys and will need to be if you are working on sub-screen. In this case, we want to add a field to the screen, so we select the Insert Object Wizard (or press F6 if you prefer). One additional point – one of the items on this new list is to Save Changes; you should do this from time to time. The customization system crashes periodically; saving changes will let you pick back up from where you last saved instead of having to start over.
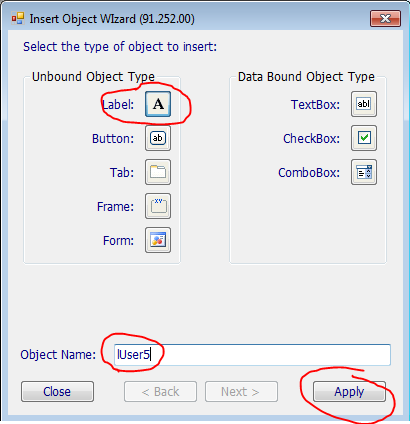
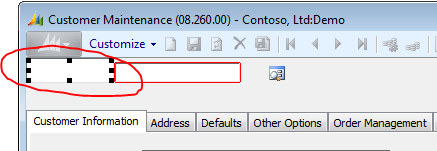
Now the Insert Object Wizard comes up. This will allow you to add fields to the screen. In this case, we need to add two – the new user field and a label to identify it. Let’s begin with the label. Press Label, fill in the Object Name, and press the Apply button. That will paste the new label to the top of the screen. (The caption will default to the name that you gave the object.)
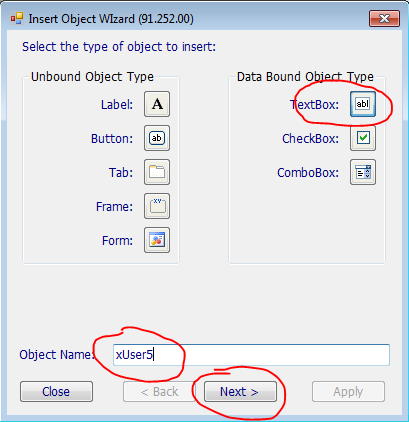
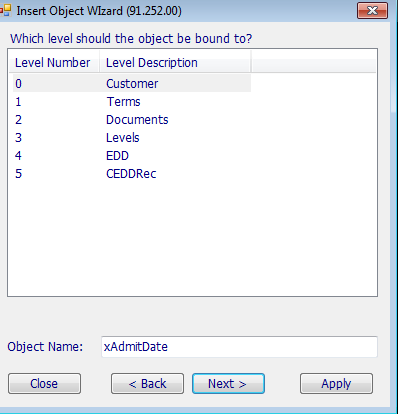
Next, insert the new text box. Press TextBox button, fill in the Object Name, and press Next.
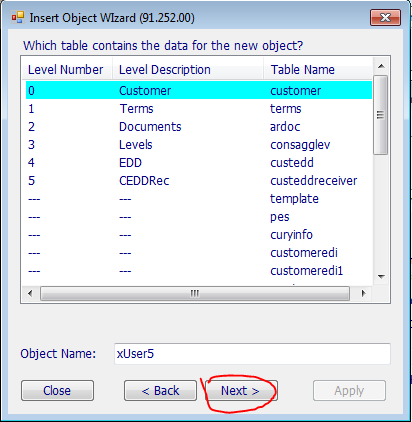
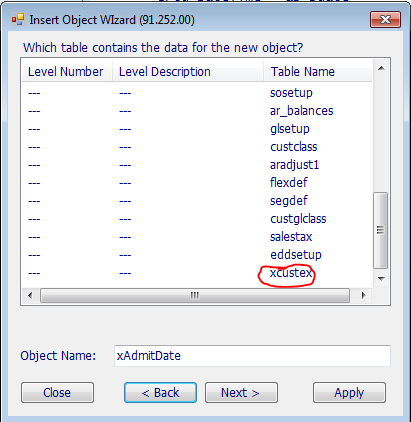
Select the table containing the field that you want from the list available in the screen, and then press Next.
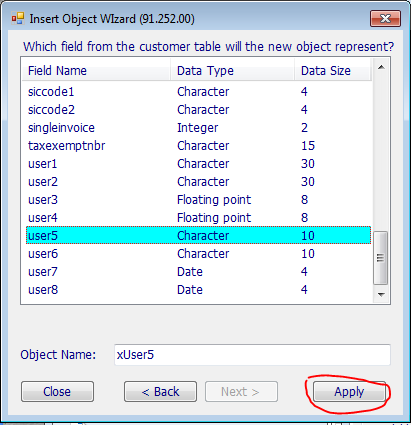
Finally, select the field to be inserted and press the Apply button to paste the field on the screen. If needed, you can actually change the Object Name on any of these 3 screens.
Now that all of the needed fields have been added to the screen, press Close to close the wizard. (The wizard will allow you to add as many fields as you want in one go.) This brings us back to the Customer Maintenance screen, with the new fields sitting in the upper left corner one on top of the other.
Drag and drop those fields to the location on the screen where you want them. (A close location is normally good enough for the time being. You can use the property window to get it exact later, and you will probably need that window at some point in any case.)
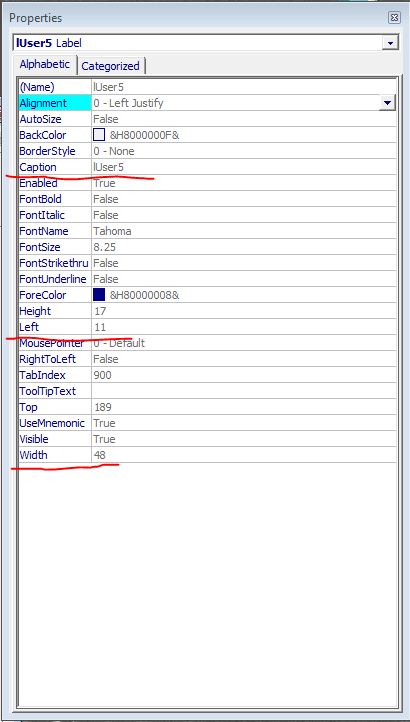
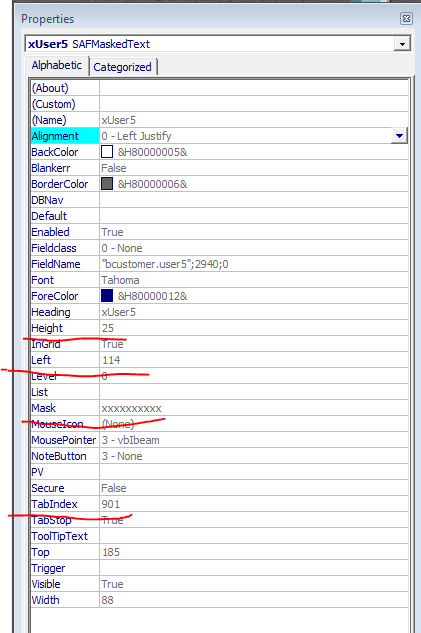
Select the field that you want to work with, and then choose Property Window from the customization menu (or press F4). This will allow you to change a number of values controlling that object. In this example, we will change the top and left values for both fields (defining the field locations), the caption for the label, and the height and tab index for the text box.
To fix the label, the Caption and Left values will be changed to “Grouping Code:” and 8 respectively, and Width will be changed to 67 (to allow the new caption to fully display).
To fix the textbox field, the Height will be changed to 21, the Left value to 112, the Mask to VVVVV (5 uppercase alpha-numeric characters), and the Tab Index to 35.
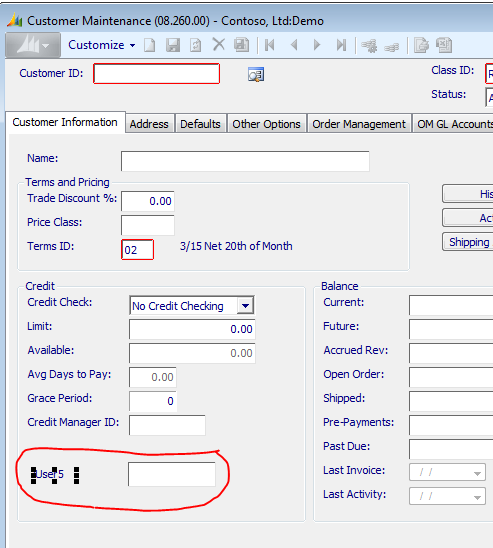
After saving the customizations and exiting customization mode, close and reopen the screen to see the final version of the changes. Notice that the window header now starts with an asterisk, indicating it has been customized.
Tabbing from the Credit Manager ID field now takes control to the new Grouping Code field. The user can then enter any alpha-numeric value of up to 5 characters into that field. No further changes are needed; the values added to that field will be saved along with the rest of the table.
Updating tables with available user fields is quite easy and should be your first choice. However, there is a limit to the number of available user fields, and repurposing fields that you don’t use yourself can be a dangerous choice. SL may use the field for some other purpose that interferes with your changes (or vice versa). If you require more custom fields than are available, your best option is to use a custom extension table to acquire them.
This adds some steps to the process, both before and after the ones previously defined. First, the steps that precede adding the new fields to the screen – creating the new table and adding it to the screen. You will need to create a table containing the additional fields you want to add to the screen and the key fields to link one-to-one with the table you want to extend (e.g., for the Customer table, that would be CustId). That will be done using SQL Server, and you will need to reopen SL after creating the new table because they still load the database schema when you bring SL up and don’t acknowledge later changes. (Don’t forget the permissions if you are using Windows Authorization.) You will also need to create a DH definition for the custom table for use in the customization. Samples of these files can be found in the “..\DB\DHFiles\App” directory under the SL applications directory.
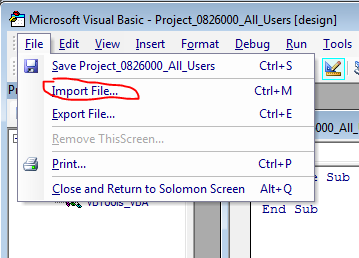
Now, bring up the Customer screen and begin customizing it. On this first pass, it will be necessary to add the table to the screen. Bring up the Visual Basic Editor from the menu (or press F7). Add the DH file containing the buffer value for the custom table using the Import File option in the File Menu.
Next, add the code to add a cursor for the table and to add the table to the screen. (Notice the declaration of the cursor at the top, as well as the two lines in the form load event.)
Save your changes and leave the screen. When you reopen the screen, the VBA_SetAddr call will add the new table to the list of tables from which you can add fields. You are now able to add new fields to the screen in the same fashion as previously described.
It does add an additional step, which would be the case for any table that is not directly linked to a level. You need to link to the same level as the table your new table is tied to. In this case, the new table ties to the Customer table or level 0. This will allow changes to your new fields to affect the status of the level when changes are made, so that you don’t need to take care of that manually. This controls the firing of the save event, allowing you to control where you perform the database interface.
Once the fields have been added to the screen, the other set of changes need to be added. One drawback of adding a custom table to the mix is that the database interface will not automatically be handled. You have to handle it yourself. This means adding code to look up the record when it needs to be loaded. (In this case, behind the ccustid_chk and Update1_OnCancel events. This list will vary by screen.)
Additionally, you will need to add code to delete the record in the Update1_OnDelete event and more code to insert or update the table in the Update1_OnUpdate event. Normally, I do a lookup into a separate buffer, then insert or update based on whether one was found; it’s easier to control that way and lets you get around the issue where an existing record lacks a matching extension.
These database interactions are performed using the SqlFetch, sInsert, sUpdate, and sDelete commands. As a sample, here is the code for the Customer ID check event:
Private Sub ccustid_Chk(ChkStrg As String, retval As Integer)
serr1 = SqlFetch1(C_xCustEx, “xCustEx_CustId” + SParm(ChkStrg), bxCustEx, LenB(bxCustEx))
Call DispFields(“form1”, “”)
End Sub
It can take some experimenting to determine all the places where database interface code needs to be added. Some screens will require changes to be added in odd places, and the code will be slightly different in different locations (e.g., ChkStrg exists in the check event, but won’t in other events), but they should all be variations on the same theme. Also, don’t forget to fill in the fields containing the link to the base record. That will result in errors on the second record entered.
This covers most circumstances for adding custom fields to a screen. There is one situation that requires additional exposition – grids. If the field being added to a grid is from the table (or one of the tables) controlled through the grid, there is no problem. Changes to the field will only be saved if that table is being saved by the screen, but the load interface will be handled for you. There are additional problems if you want to add a new custom table to the grid. I very strongly recommend not doing that.
The new code addition needed to add another table (not merely a custom one) to a grid involves adding the following lines to the Form1_Load event:
Mhandle = GetGridHandle(“SafGrid1”)
Call VBA_Mextend(Mhandle, “bxCustEx”, LenB(bxCustEx))
You need to define the Mhandle variable as an integer in the same manner as the cursor variable. The name of the grid will be different on different screens, but you can find the name from the left dropdown list in the VB Editor screen.
This will add the custom table to the grid, but you will still need to look up the values to add them to the grid. This means looping through the grid (after it has been loaded), looking up the record that goes with each line, and updating that grid line using MUpdate. This code will need to be fired by any event that changes the data in the grid.
That only takes care of loading existing data. If you want to save changes, code will need to be added to the OnUpdate event to handle that interface. First, get the DelGridHandle and delete from the custom table any records deleted from the grid. Next, go through the grid and insert or update records in the custom table; this is largely the same methodology for managing the database interface in a normal level, just inserted into a loop going through the lines in the grid. Yes, this description is overly terse, but it should be enough if you are truly ready to make such a change.
One last reminder – any time you have changed the active line in a grid, remember to use an MDisplay call to resynchronize the Memory Array and the Grid. Failure to do this will normally result in an error message that the two are out of sync, as well as a crashed screen. Sometimes you need to perform the MDisplay within processing loops, and sometimes you do not. Normally, I try leaving it out of the loops and only add it if that doesn’t work. The command makes the active line to the top line displayed by the grid.
If you have any additional questions regarding adding custom fields to a screen or any questions regarding Dynamics SL, please contact us at any time.
For additional tips and tricks regarding Microsoft Dynamics SL and other Dynamics products, visit our blog.
Note: This post was reviewed in July 2017 to ensure it is still current.


